Mouskateers!! This is a guest post from an AMAZING friend of mine. It is beyond the best! She has figured out exactly what I would want to wear to the parks if I were going to dress up as a princess (which I still might do!) I hope you enjoy this post, I anticipate it being one of my most pinned projects!
Practical Princess Dress Tutorial
My daughter was thrilled when we told her about her very first trip to Disney World! She twirled around, singing and giggling. It was as if Tinkerbell had sprinkled fairy dust in our very living room.
In the midst of this happy dance, the sweet girl turned to me and said in her most excited voice, “OH! I can dress up as the princesses every day!”
It was as if beautiful music were playing, then someone yanked the needle across the record. RRRRRPPPPPP. Silence.
The girl is not very princess-y. She has only two store-bought princess dresses. They are, indeed, magical. But have you ever felt them? Hers are practically made out of plastic. Several layers of hot, scratchy, airless, long-sleeved, sharp-seamed plastic. Why don’t I just duct tape her into sparkly sandpaper and call it a day?
(Here I will take a moment to say that children who have worn their storebought dresses to Disney World are super troopers who are obviously superior to my child. I bow down to these fashionistas who are willing to put magic over comfort. Seriously – these kids are splendid, and I wish my kid were less sensitive. But she’s not. She can wear those dresses for about an hour. But an entire day in 100 degree heat? Nope nope nope. So – moving on here.)
You know what I wanted her to wear? A cap-sleeved breathable t-shirt to cover her shoulders from the glaring sun, and soft skirt that was short enough to stay cool and long enough to cover up her dignity (as my grandmother used to call it).
Then the beautiful music in my head started to play again slowly . . . .
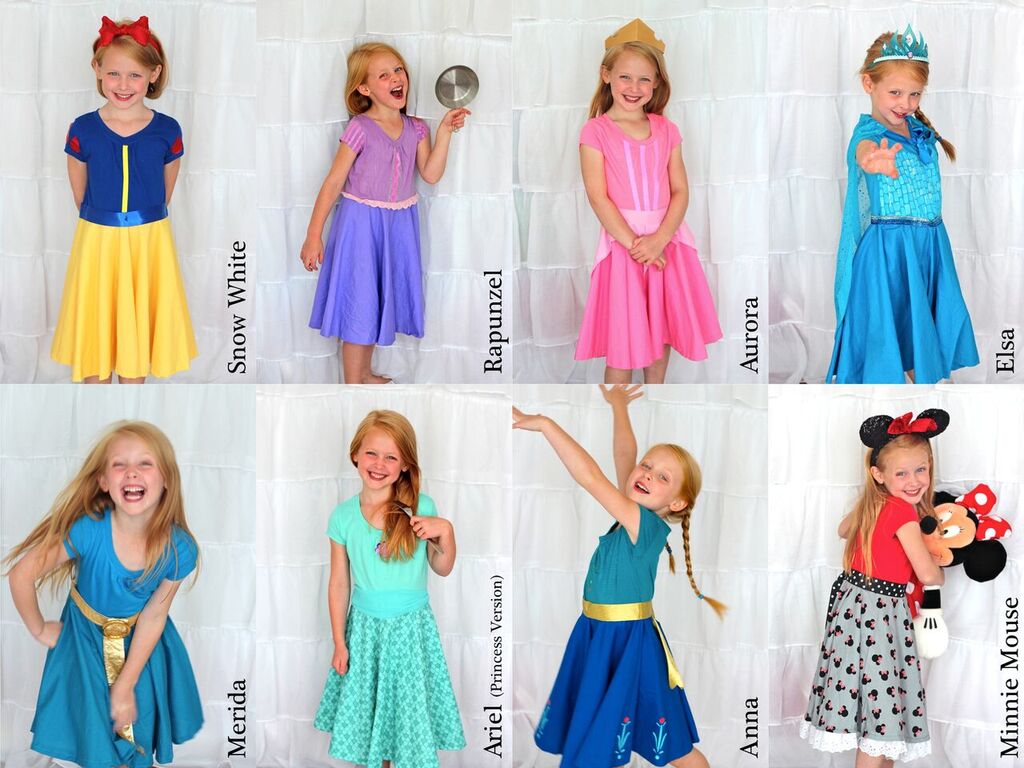
I’m no seamstress. But surely I could make something that would fit both sets of requirements? And the practical princess dresses were born. Here’s the equation: T-Shirt + Circle Skirt + Decoration = Practical Princess.
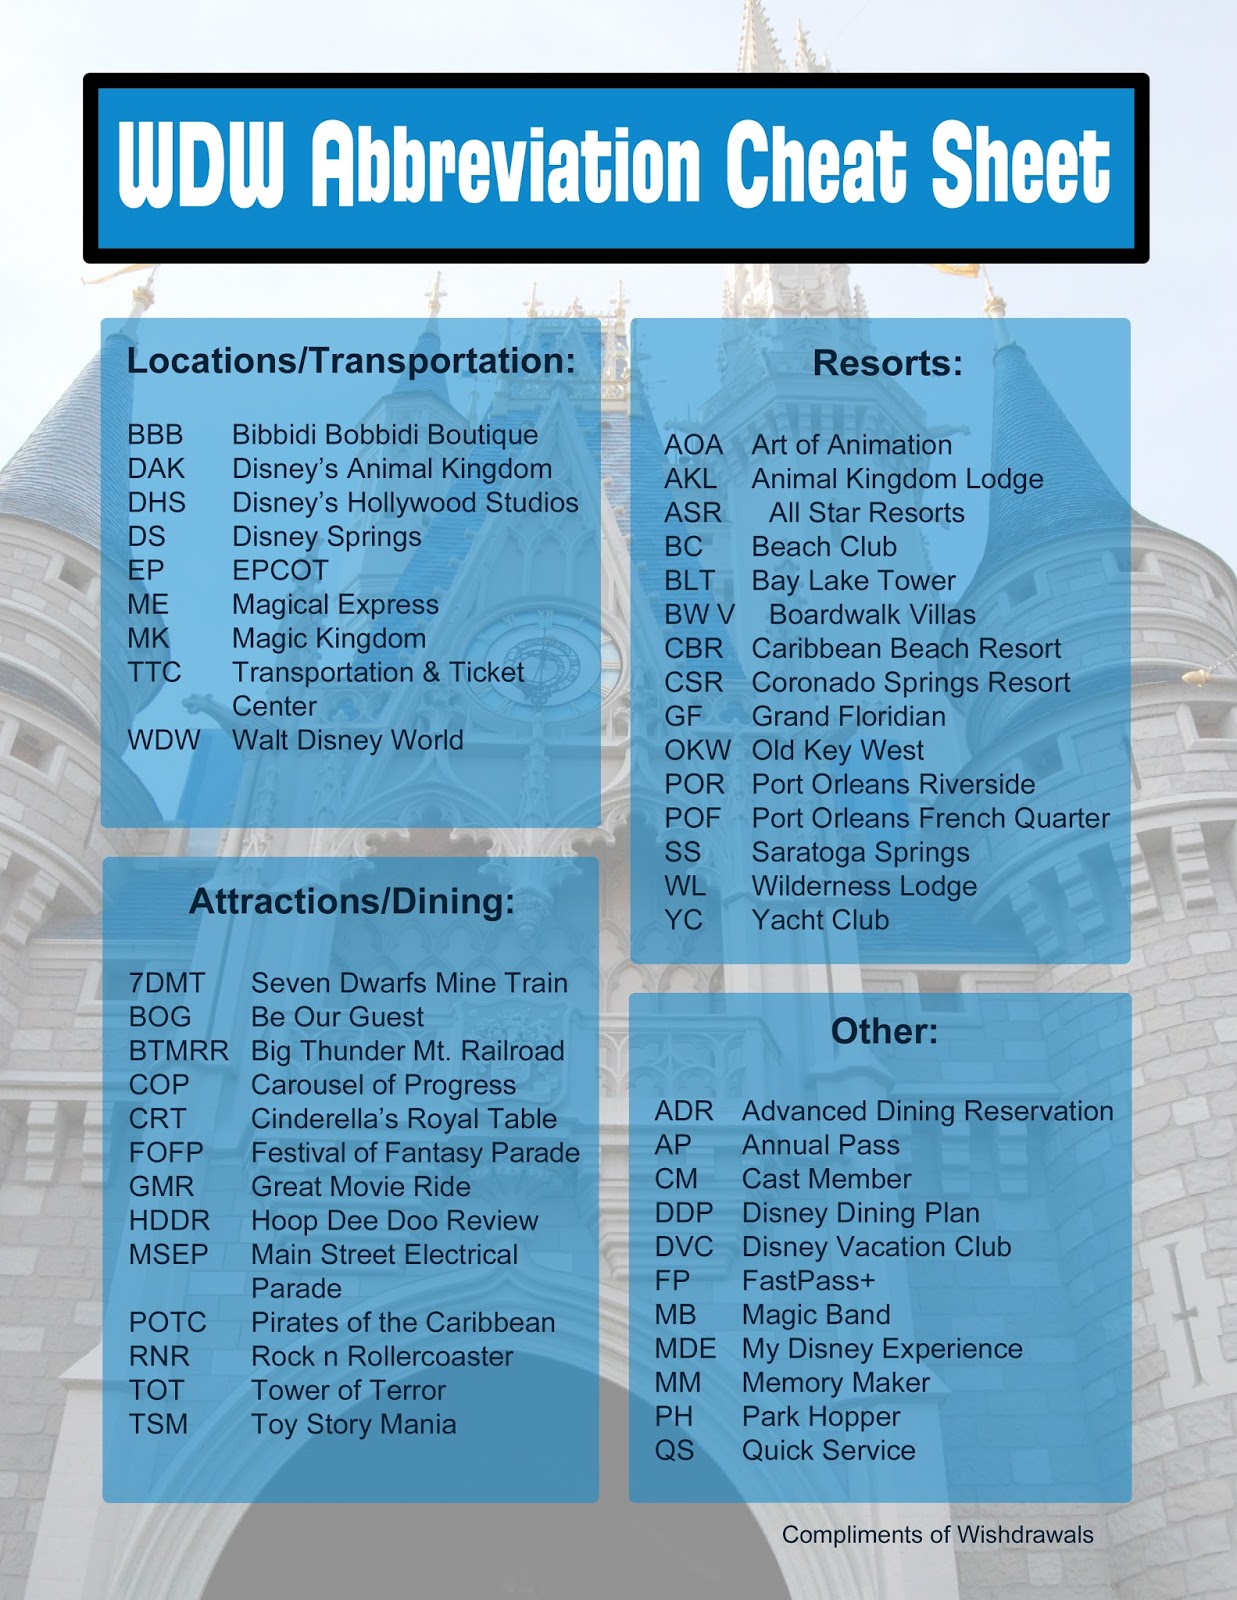
Step One: Choose Your Princesses
We are going to Florida for eight days (five days of Disney World, plus two travel days and one “free” day), so I decided to make eight dresses. This is insane. One dress is more than enough. They are easy to make, but don’t lose your mind, OK? OK.
My sweet girl loves these princesses: Elsa (obviously), Anna, Rapunzel, Merida, Ariel, Aurora (Sleeping Beauty), and Snow White. I needed one more. What about the ultimate Disney princess . . . Minnie?! Then I came up with a plan for how to make each dress.
Princess
|
Top Tee
|
Bottom Fabric
|
Decoration
|
Elsa
|
aqua
|
aqua
|
shimmery rectangles on front, cape attached to back
|
Anna
|
dark green
|
royal blue
|
floral designs
|
Rapunzel
|
dark lavender
|
darker lavender
|
pink laces on the top and stripes on sleeves
|
Merida
|
dark teal
|
dark teal
|
gold belt
|
Ariel
|
green blue
|
green fish scales
|
floaty belt, purple seashell at neckline
|
Aurora
|
medium pink
|
same pink
|
pointy peplum in lighter pink
|
Snow White
|
royal blue
|
yellow
|
red teardrops on sleeves, yellow stripe down the front
|
Minnie
|
red
|
Minnie pattern
|
ruffle underneath skirt
|
Step Two: Choose Your Fabrics
I started with the tops. I wanted inexpensive, soft shirts that were part cotton for breathability and part polyester to wick moisture away. I bought mine from Amazon
here. You may have to shop around a bit to find the colors and sizes you want. That’s what Google is for, am I right?
Once the shirts arrived in the mail, I took them to my local fabric store to choose the skirt material. I included my daughter in this part, which she loved. We held up each shirt to the lightweight cotton quilting fabrics, and she helped me choose just the right ones. Fun!
For my tall 5-year-old daughter, I bought 1.5 yards of each 40-44” wide fabric, which allowed me to cut a single circle skirt. The Ariel skirt had a directional fish scale pattern (that needed to go a certain way to look right), for which I needed 2.5 yards of fabric. I will explain more about this later.
If you plan ahead, you can also choose trims for the dress belts while you are at the fabric store. You can make these out of the skirt fabric if you like, but I wanted to add a little something extra at this stage. Here are the trims I chose:
Princess
|
Belt Trim
|
Elsa
|
blue and silver sparkle ribbon
|
Anna
|
gold ribbon
|
Rapunzel
|
light pink scalloped eyelet
|
Merida
|
gold belt from home – taken from outgrown merida dress
|
Ariel
|
green floaty fabric
|
Aurora
|
medium pink grosgrain
|
Snow White
|
royal blue satin (I had a little piece of this at home)
|
Minnie
|
black and white polka dot grosgrain
|
 I measured around her waist and added enough length for a knot and maybe a bow for each belt. And then I used a coupon to buy it all.
Step Three: Cut It Out
Wash and dry the shirts and fabrics. Then iron the fabrics so there are no wrinkles. I hate doing this part.
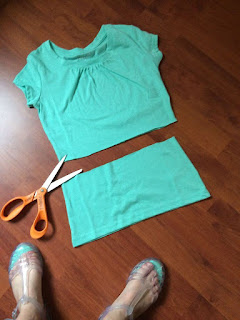
Try a shirt on your child and decide where you would like the waist to fall. Keep in mind that the knit fabric of the shirt stretches quite a bit when the skirt is attached, so mark where the waist would be, and then cut about an inch above that. Even with the seam allowance, you should be good. My five-year-old took this photo to show her "glass" slippers.
Now, measure the width of the cut part of your shirt, across the front. When you multiply that by two, you now have the circumference (the size of the waist) for your skirt fabric.
Next, you use geometry (circumference, radius, pi) to figure out how to cut out the waist. I’ll make it easy for you – the next measurement you need (the radius) is the circumference divided by 6.28 (aka 2 times pi). BUT! Round down here. You can always cut a little more to make the waist bigger, but you can’t add fabric back to make it smaller.
For my skirt, the measurements went like this: Across the front of the shirt was 12”. That means that my waist would be 24”. The radius for my next step would be 3.8”. I rounded down to 3.5” just to be safe, and it worked perfectly.
Take your washed and ironed fabric (a) and fold it in half (b), then in half again the other way (c).
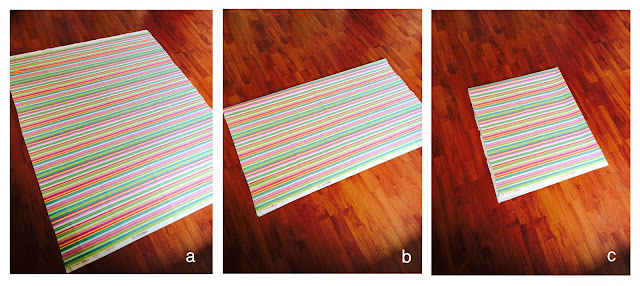
Go to the corner fold (where all the folds are together) and measure toward the shortest part of the fabric out the length of your radius. While you have your tape measure on this line, go to the end of your fabric, and note that measurement. That’s how long the skirt fabric will be all the way around. You can make it shorter if you want, but my girl has crazy long legs. And don't forget you will be hemming the skirt later, so it will be a little shorter for that reason, too.
Keeping the zero edge of your tape measure in line with the corner fold, move the tape measure end in an arc from one edge of the fabric to the other, marking the waist radius (shown in the pictures with my finger) and the skirt length radius (shown with a pencil) all the way along.
Connect the marks you made using a curved line.
With the fabric still folded, cut along the two lines you made. Your circle skirt is now cut out!
(Note: the circle you cut out for the waist makes an excellent barbie skirt if you cut a little tiny circle out of the middle. My daughter designed her own dresses while I was sewing. Hours of fun using scraps.)
If you are using directional fabric, the process is harder. If you make a circle using the instructions above, your pattern will be upside down on the back and sideways on each of the sides. Let me just say this: if you haven’t made a gored skirt before, I highly recommend you start with a non-directional fabric.
To make Ariel’s skirt, I had to make a paper pattern for the skirt, which essentially involved making the same circle described above out of really big paper, then cutting it into one-eighths. I pinned each piece of paper on the fabric in the direction I wanted for the skirt, and I remembered to cut about ¼” outside the two sides of each paper wedge for the seam allowance. Then, pinning right sides together, I sewed the wedges together to make the skirt.
Step Four: Sew the Dress
Back to the easier part. Turn the skirt inside out, and then tuck the right-side-out dress inside it. I’m using Ariel’s skirt now, in which you can see the wedges I discussed above:
Make sure that the right sides of your shirt and skirt are facing each other, but not facing you. (I did this wrong the first time. Grrrr.)
Pin the sides of the shirt to the sides of the skirt. I used my fold lines on the skirt fabric (from when I cut it) to line up the sides with the side seams of the shirt. Also pin the front center and back center of the shirt to the skirt (again, using the fold lines on the fabric, if they are visible). Pin in between those four pins until you are pinned all the way around.
Now, sew the pieces together using a ½” seam allowance, starting at one of the side seams. Take out the pins and turn it right side out.
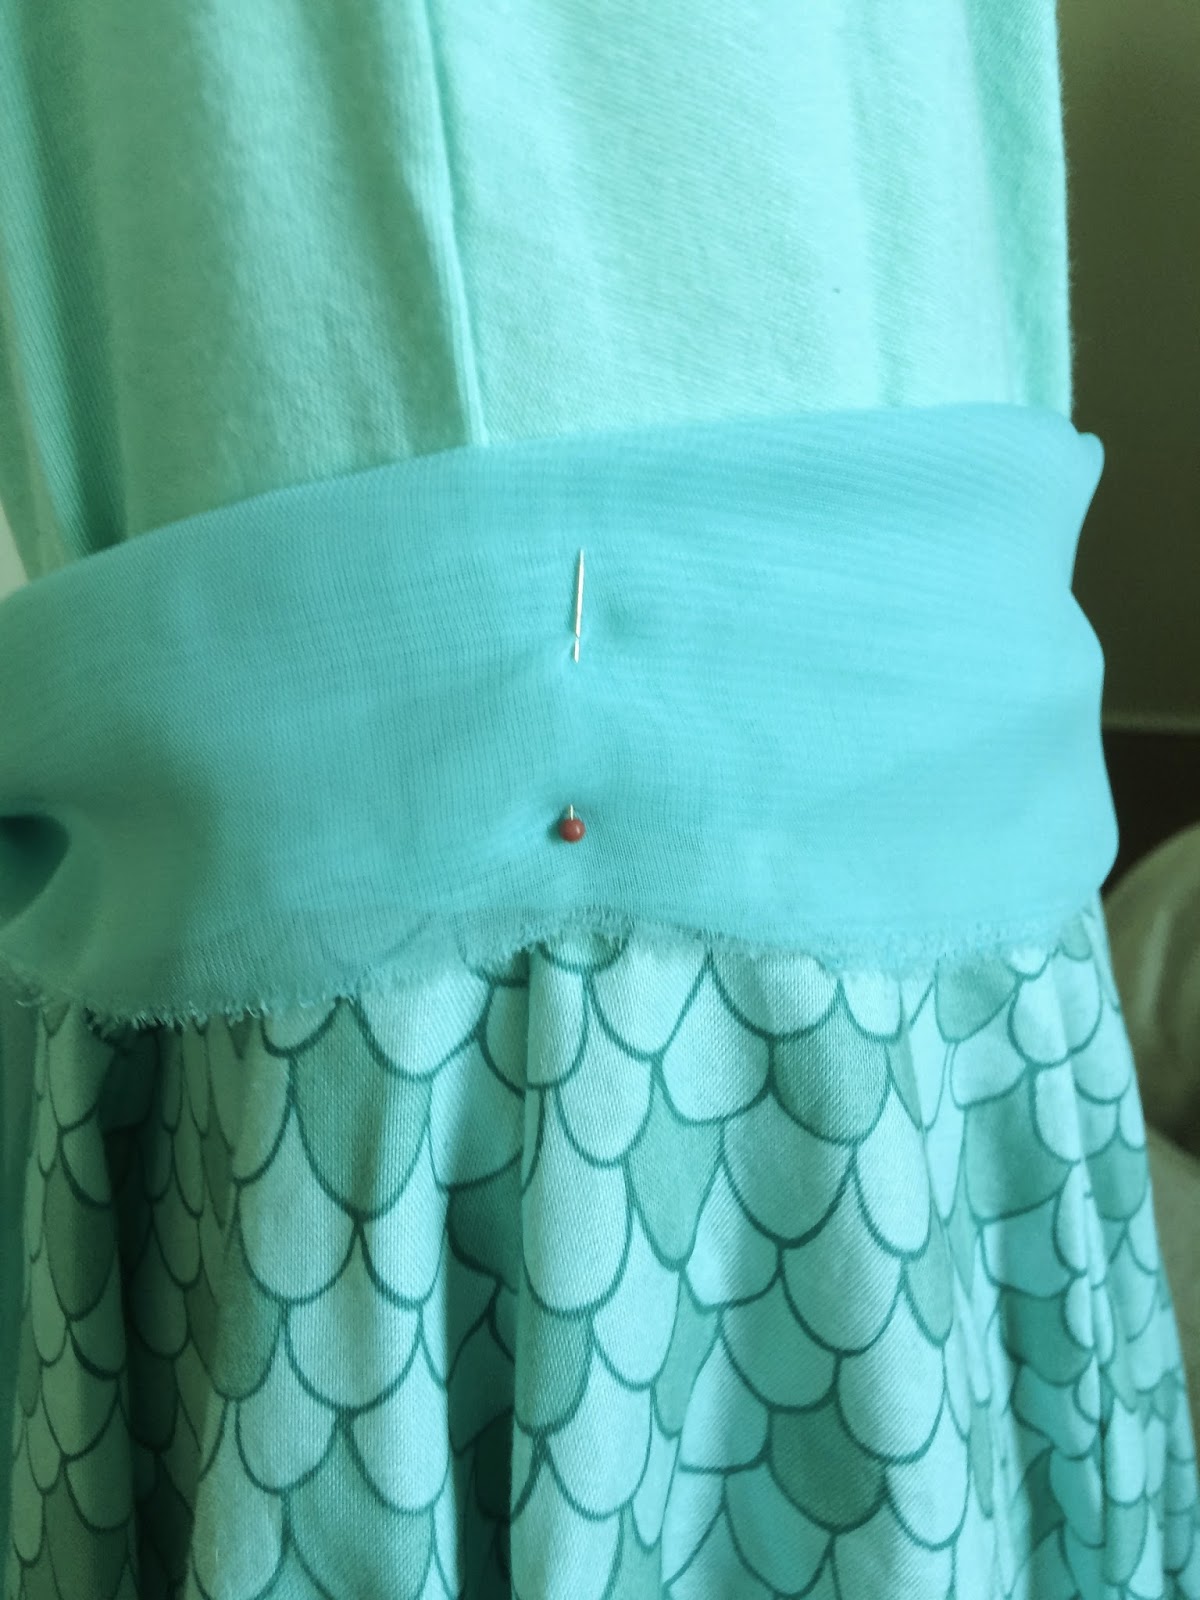
Step Five: Add a Belt

Now, sew on your belt. If you want to make it out of the skirt fabric, make a fabric tube, turn it inside out, and topstitch the ends to make a fabric ribbon. Or, use something bedazzled for the extra princess factor.
Pin the center of the belt ribbon to the center of the waist seam. Using thread that matches the belt ribbon and just a few tiny stitches, top stitch the belt in the center. I used two or three stitches forward and two or three stitches back.

Remove the center pin and try the dress on your kid. The twirl factor is fantastic! Tie the sash around her waist to see where you should stitch it down on the sides so it will lay flat. I put a pin in the belt ribbon to mark the spot (but not through the dress, because that would hurt when she takes the dress off!).

Have her take the dress off, and pin the marked places to the sides of the dress, lining up with the side seams on the shirt. Ariel's belt needs to look fluffy, so it's gathered a bit here. Topstitch the belt sides down.
Hem the skirt to the length you would like. I let my five-year-old help with this, so the hems are imperfect. But she participated in making her own dresses. So it’s all good.
Have her try it on again, tie the belt in back, and breathe a sigh of accomplishment. Good job, lady (or sir)! You have done the biggest part!
Step Six: Extra Magic
Whew. Almost done! Now you get to add any extra decorations. The hardest dress by far was Anna’s which required intricate colored patterns. Fortunately, I had a friend with a cricut machine, iron-on vinyl, and a heart of gold. She helped me cut out these patterns and iron them on (being very careful to avoid the meltable belt). BUT! You can do it without this part if you want to freehand it or create your own stencil using the butcher paper method. You then use fabric paint to paint on the designs.
The other designs are MUCH easier – a few Xs on Rapunzel’s shirt, plus a few stripes on the sleeves. Two teardrops on Snow White’s sleeves and a line down the middle. Just enough to reference the princess for anyone who has a drop of imagination. For Merida, I carefully cut off the belt from a storebought dress and sewed in the front strip as I attached the skirt to the shirt. For Aurora, I made a peplum that mimicked her princess dress, and then sewed it in as I attached the skirt to the shirt. I put the belt over it using the belt instructions, above. For Minnie, I sewed white eyelet trim along the hemline. For Elsa’s bodice I painted some shimmery acrylic paint in narrow recangles, then heat set the paint by pressing with an iron by pressing through the inside of the shirt. ) I also attached the floaty sequined cape fabric with a ribbon at her neck. My daughter picked out the cape fabric, but she now thinks it's itchy, so it may be ditched early in the day, which is A-OK with me.
And that is how my daughter can dress as a princess for every single day of our summer Disney trip. Cue the “Jolly Holiday” song as we exit stage right.
 Did you know that August is National Eye Exam Month? Well to celebrate that we are showcasing all our designs with Disney Eyes from my Redbubble shop! I still think Wall-E is my favorite!